Custom Code
Sometimes you need to add code that the visual editor does not cover -- an analytics tracker, a custom font, a CSS framework, or a meta tag. The Settings dialog includes a code editor for the <head> tag, and a custom code component lets you embed arbitrary HTML and JavaScript anywhere on the page.
Two things to keep in mind:
- Head code runs on every page (site level) or one page (page level). Choose the right scope so tracking scripts do not fire where they should not.
- Custom code blocks are part of the page content. They live inside the
<body>and render wherever you place them on the canvas.
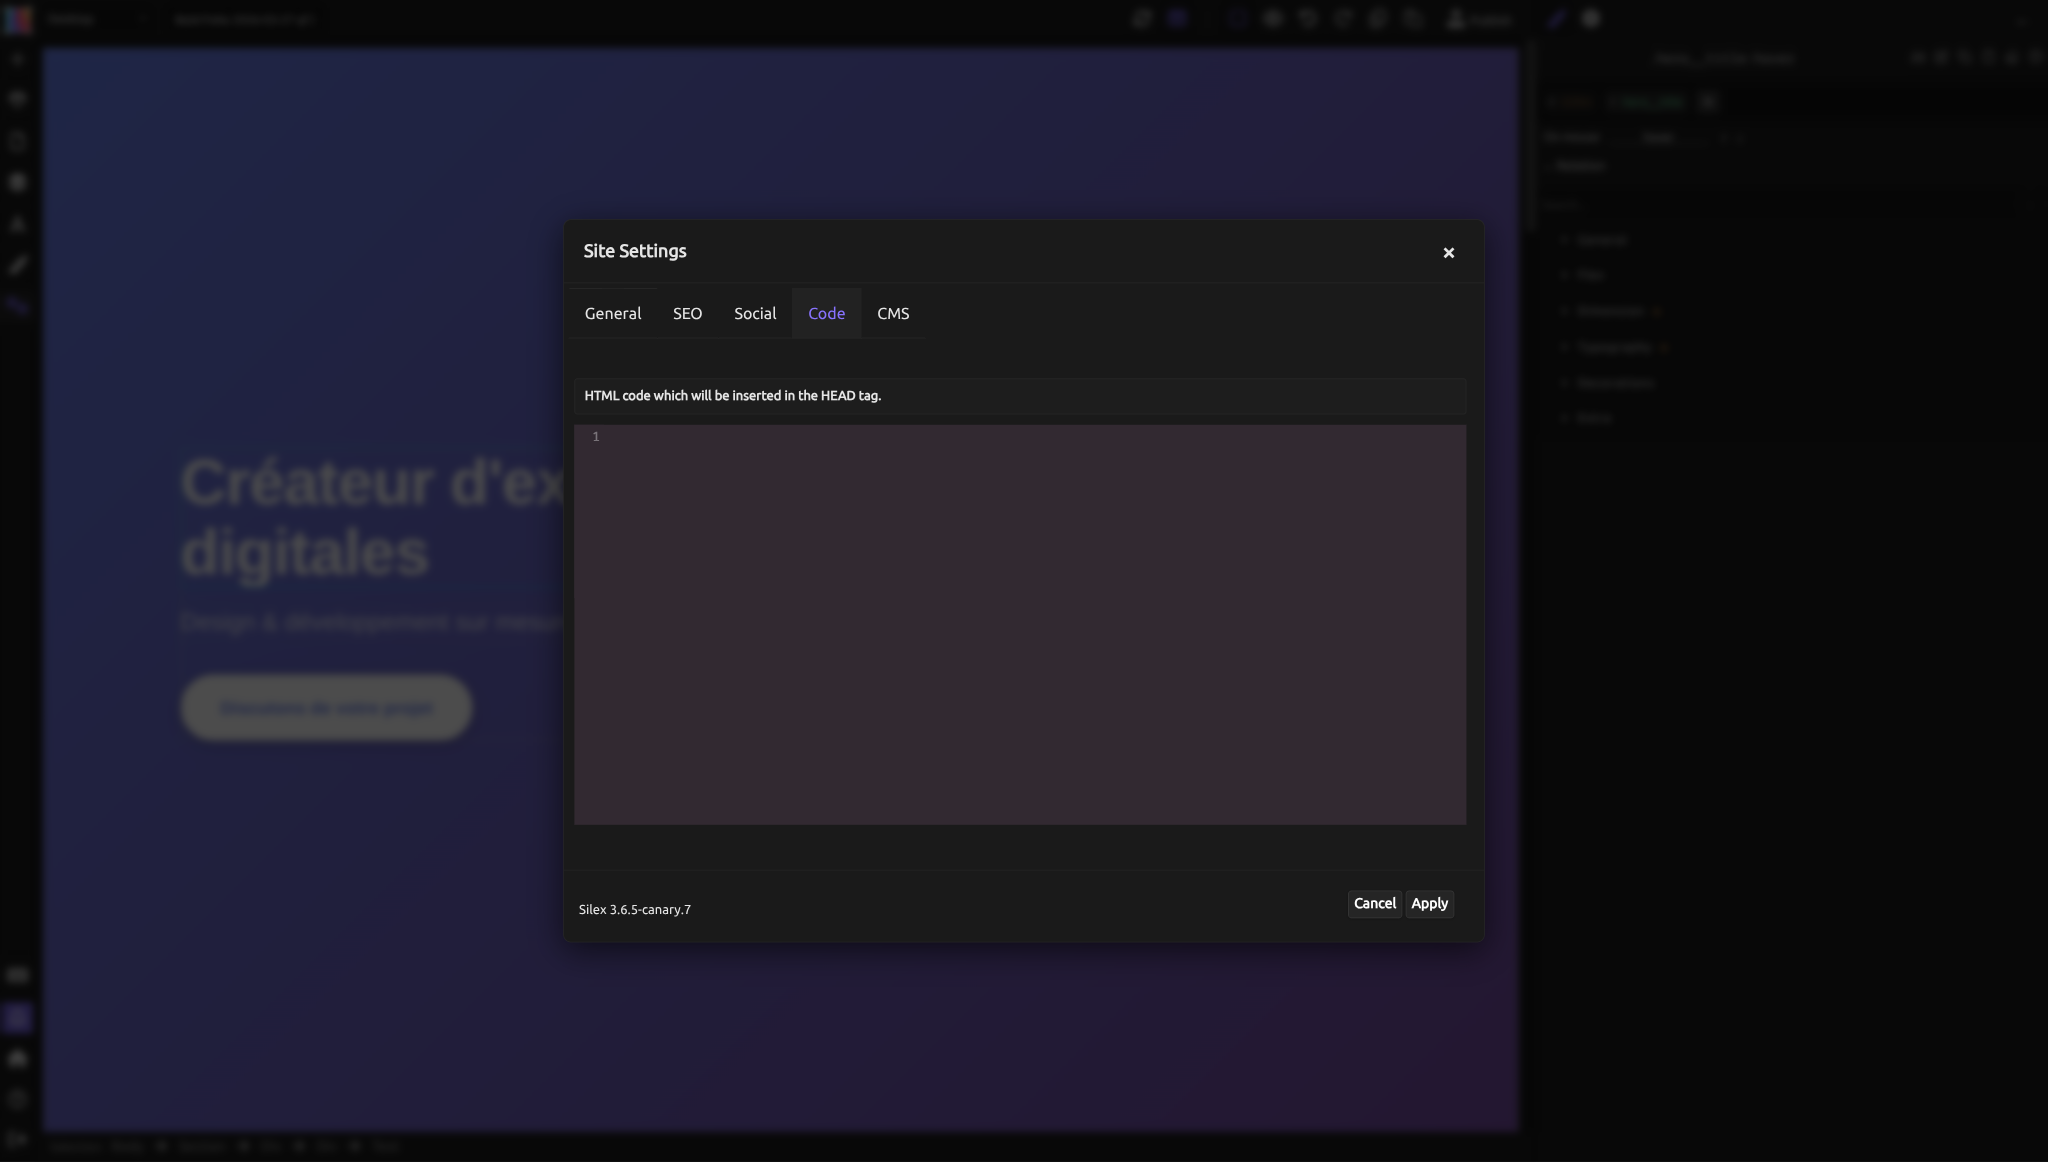
The head editor
The head editor is a code editor inside the Code tab of the Settings dialog. It lets you write HTML that will be injected directly into the <head> element of your published pages.
Opening the head editor
- Click the gear icon in the left sidebar to open the Settings dialog.
- Select the Code tab.
- You will see a code editor with syntax highlighting and line numbers.
- Write your HTML.
- Click Apply (or press Ctrl+Enter).
Site-level vs. page-level head code
When you open Site Settings and add code in the Code tab, that code appears in the <head> of every page on your site. When you open Page Settings and add code, it only applies to that one page.
Both are injected. They do not replace each other. If you have site-level head code and page-level head code, both will be present in the published HTML -- the site code first, then the page code.
This means you can:
- Add Google Analytics at the site level so it tracks every page.
- Add a page-specific canonical tag or a
noindexdirective on individual pages without affecting the rest of the site.
Live preview
When you apply head code, the editor immediately injects it into the canvas preview. If you add an external stylesheet, you will see its effects right away. If you add a script, it will execute in the preview frame. This lets you verify that your code works before publishing.
Common use cases for head code
Google Fonts
Load a font from Google Fonts by pasting the <link> tag into the head editor:
<link rel="preconnect" href="https://fonts.googleapis.com">
<link rel="preconnect" href="https://fonts.gstatic.com" crossorigin>
<link href="https://fonts.googleapis.com/css2?family=Inter:wght@400;600;700&display=swap" rel="stylesheet">
After adding this, the font "Inter" becomes available in the Style panel's font-family dropdown. You can then apply it to any element.
Tip: Add font links at the site level so the font is available on all pages. If you only add it on one page, elements using that font on other pages will fall back to a default.
Google Tag Manager
Add the GTM container snippet to track visitor behavior across your entire site:
<!-- Google Tag Manager -->
<script>(function(w,d,s,l,i){w[l]=w[l]||[];w[l].push({'gtm.start':
new Date().getTime(),event:'gtm.js'});var f=d.getElementsByTagName(s)[0],
j=d.createElement(s),dl=l!='dataLayer'?'&l='+l:'';j.async=true;j.src=
'https://www.googletagmanager.com/gtm.js?id='+i+dl;f.parentNode.insertBefore(j,f);
})(window,document,'script','dataLayer','GTM-XXXX');</script>
<!-- End Google Tag Manager -->
Replace GTM-XXXX with your container ID. Add this at the site level so tracking works on every page.
Custom CSS
Add a <style> block to define styles that the visual editor does not support or that you want to write by hand:
<style>
  /* Smooth scrolling for anchor links */
  html {
    scroll-behavior: smooth;
  }

  /* Custom selection color */
  ::selection {
    background-color: #3b82f6;
    color: white;
  }
</style>
When to use this vs. the Style panel: Use the Style panel for element-specific styles you want to manage visually. Use custom CSS in the head for global behaviors, pseudo-elements, animations, or anything the Style panel does not expose.
Canonical tags
Tell search engines which URL is the original version of a page:
Add this at the page level because each page has its own canonical URL. See SEO for more on why canonical tags matter.
Robots meta tag
Prevent search engines from indexing a specific page:
Add this at the page level on draft pages, thank-you pages, or admin pages. Do not add it at the site level unless you want your entire site hidden from search engines.
External CSS frameworks
Load a CSS framework like Normalize.css or a utility library:
<link rel="stylesheet" href="https://cdnjs.cloudflare.com/ajax/libs/normalize/8.0.1/normalize.min.css">
Add at the site level if you want the framework on every page.
Verification tags
Many services (Google Search Console, Bing Webmaster Tools, Pinterest) ask you to verify site ownership by adding a meta tag:
Add this at the site level. It only needs to be on one page (usually the homepage), but having it on all pages does no harm.
Custom code blocks
The head editor is for code in the <head>. But sometimes you need to embed HTML, CSS, or JavaScript inside the page body itself -- a contact form widget, an embedded video player, a live chat button, or an interactive component.
For this, use the Custom Code component. It lets you place a block of arbitrary HTML anywhere on your canvas.
Adding a custom code block
- Open the Components panel (the plus icon or blocks panel in the left sidebar).
- Find the Custom Code block.
- Drag it onto the canvas where you want it.
- Double-click the block to open the code editor.
- Write your HTML, CSS, or JavaScript.
- Save and close the editor.
The block renders your code in the preview. If your code produces visible output (a form, a widget, a chart), you will see it directly on the canvas.
Use cases for custom code blocks
Embed a form. Paste the embed code from a form service (Typeform, Google Forms, Tally, etc.) into a custom code block. The form appears on your page wherever you placed the block.
Add an interactive widget. Chat widgets, appointment booking tools, and social media feeds often provide embed codes. Paste them into a custom code block.
JavaScript-powered components. If you need a component that requires JavaScript -- a slideshow, an accordion, a dynamic counter -- write it in a custom code block. The JavaScript executes in the browser when the page loads.
Embedded maps. Google Maps and OpenStreetMap provide <iframe> embed codes that you can paste into a custom code block.
Custom code blocks vs. head code
| Head editor (Code tab) | Custom code block | |
|---|---|---|
| Location in HTML | Inside <head> |
Inside <body>, wherever you place it |
| Scope | Site-wide or per-page | Only on the page where you add it |
| Typical content | Meta tags, stylesheets, analytics, fonts | Forms, widgets, embeds, interactive components |
| Visible on canvas | No (head content is invisible) | Yes (renders in place) |
| How to add | Settings dialog > Code tab | Drag Custom Code block from Components panel |
Safety and performance
Scripts in the head
Every script you add to the head runs before the page renders. Too many scripts slow down your page. Keep head scripts to essentials: analytics, fonts, and critical meta tags.
If a script does not need to run before the page loads, put it in a custom code block at the bottom of the page instead, or add the async or defer attribute:
async loads the script in parallel and runs it as soon as it is ready. defer loads it in parallel but waits until the page is fully parsed. Both prevent the script from blocking page rendering.
Third-party code
Every third-party script (analytics, chat widgets, ad trackers) is a potential performance and privacy concern. Only add what you actually need. Remove scripts for services you no longer use.
Testing
After adding custom code, always:
- Check the editor preview to confirm it works.
- Publish and test on the live site.
- Check the browser console (F12 > Console) for JavaScript errors.
- Test on mobile -- some embed codes do not resize well.
Common mistakes
- Adding a
<script>in the head that should be in the body. Analytics and fonts belong in the head. Interactive widgets and embed codes belong in custom code blocks in the body. - Forgetting to set the right scope. Site-level head code runs on every page. If you add a page-specific canonical tag at the site level, every page gets the same canonical URL -- which is wrong.
- Pasting code with curly quotes. If you copy code from a blog post or PDF, curly quotes (
"") may replace straight quotes (""). This breaks HTML. Always copy from the original source or a code editor. - Not testing after publishing. The editor preview is close to the published result, but not identical. Always verify on the live site.
- Loading too many external scripts. Each script adds a network request and parsing time. Five analytics and tracking scripts can add seconds to your page load. Audit regularly and remove what you do not use.
Advanced: execution order and interaction between site and page head code
Injection order
When a page is published, the head code is injected in this order:
- Standard generated tags (title, description, favicon, Open Graph tags)
- Site-level custom head code
- Page-level custom head code
This means page-level code can override site-level styles (later CSS rules win) and page-level scripts run after site-level scripts.
Overriding site-level styles
If your site-level head code adds a stylesheet and you want to override a specific style on one page, add a <style> block in that page's head code with a more specific selector or the same selector (it wins because it comes later in the document).
Avoiding duplicate scripts
If you load the same script at both the site level and the page level, it will execute twice. This can cause errors or double-counting in analytics. Use site-level for scripts that should run everywhere. Use page-level only for scripts unique to that page.
Content Security Policy
If your hosting provider enforces a Content Security Policy (CSP), external scripts and stylesheets may be blocked. Check your browser console for CSP errors if third-party code does not load. The fix depends on your hosting setup and is outside the scope of the Settings dialog.
Quiz
Q1: You want to add Google Analytics tracking to your entire site. Where do you put the tracking code?
- A) In a Custom Code block on the homepage
- B) In the Code tab of Site Settings
- C) In the Code tab of each page's Page Settings
Answer
B) In the Code tab of Site Settings. Site-level head code runs on every page, which is what you want for analytics. Option A only tracks the homepage. Option C works but requires adding the code to every page manually.
Q2: You pasted a contact form embed code into the head editor, but nothing appears on the page. What went wrong?
- A) The embed code is broken
- B) The head editor injects code into the
<head>, which is invisible -- form embed codes should go in a Custom Code block in the body - C) You need to add CSS to make it visible
Answer
B) The head editor is for invisible <head> content. Forms and other visible elements belong in a Custom Code block, which renders inside the page body. The <head> is for meta tags, stylesheets, and scripts -- not visible HTML.
Q3: You added a Google Font link in the head editor of one page's Page Settings. On other pages, text set to that font looks wrong. Why?
- A) Google Fonts has a limit on how many pages can use the font
- B) The font is only loaded on the page where you added the link -- other pages do not have it
- C) You need to clear the browser cache
Answer
B) The font is only loaded on the page where you added the link. Add font links at the site level so they are available on every page. Page-level head code only applies to that specific page.
Q4: Your page loads slowly after adding several third-party scripts. What should you check first?
- A) Whether any scripts can use the
asyncordeferattribute - B) Whether the scripts are in the wrong order
- C) Whether the scripts need to be minified
Answer
A) Whether any scripts can use async or defer. These attributes prevent scripts from blocking page rendering. Also audit whether you still need all of them -- removing unnecessary scripts is the best performance improvement.
Q5: You want to prevent your "Thank You" page from appearing in search results. What do you add, and where?
- A)
<meta name="robots" content="noindex, nofollow">in the Code tab of that page's Page Settings - B)
<meta name="robots" content="noindex, nofollow">in the Code tab of Site Settings - C) Remove the page title in SEO settings
Answer
A) Add the robots meta tag in that page's Page Settings Code tab. This hides only that page from search engines. Adding it at the site level would hide your entire site. Removing the title does not prevent indexing.