Loops and lists
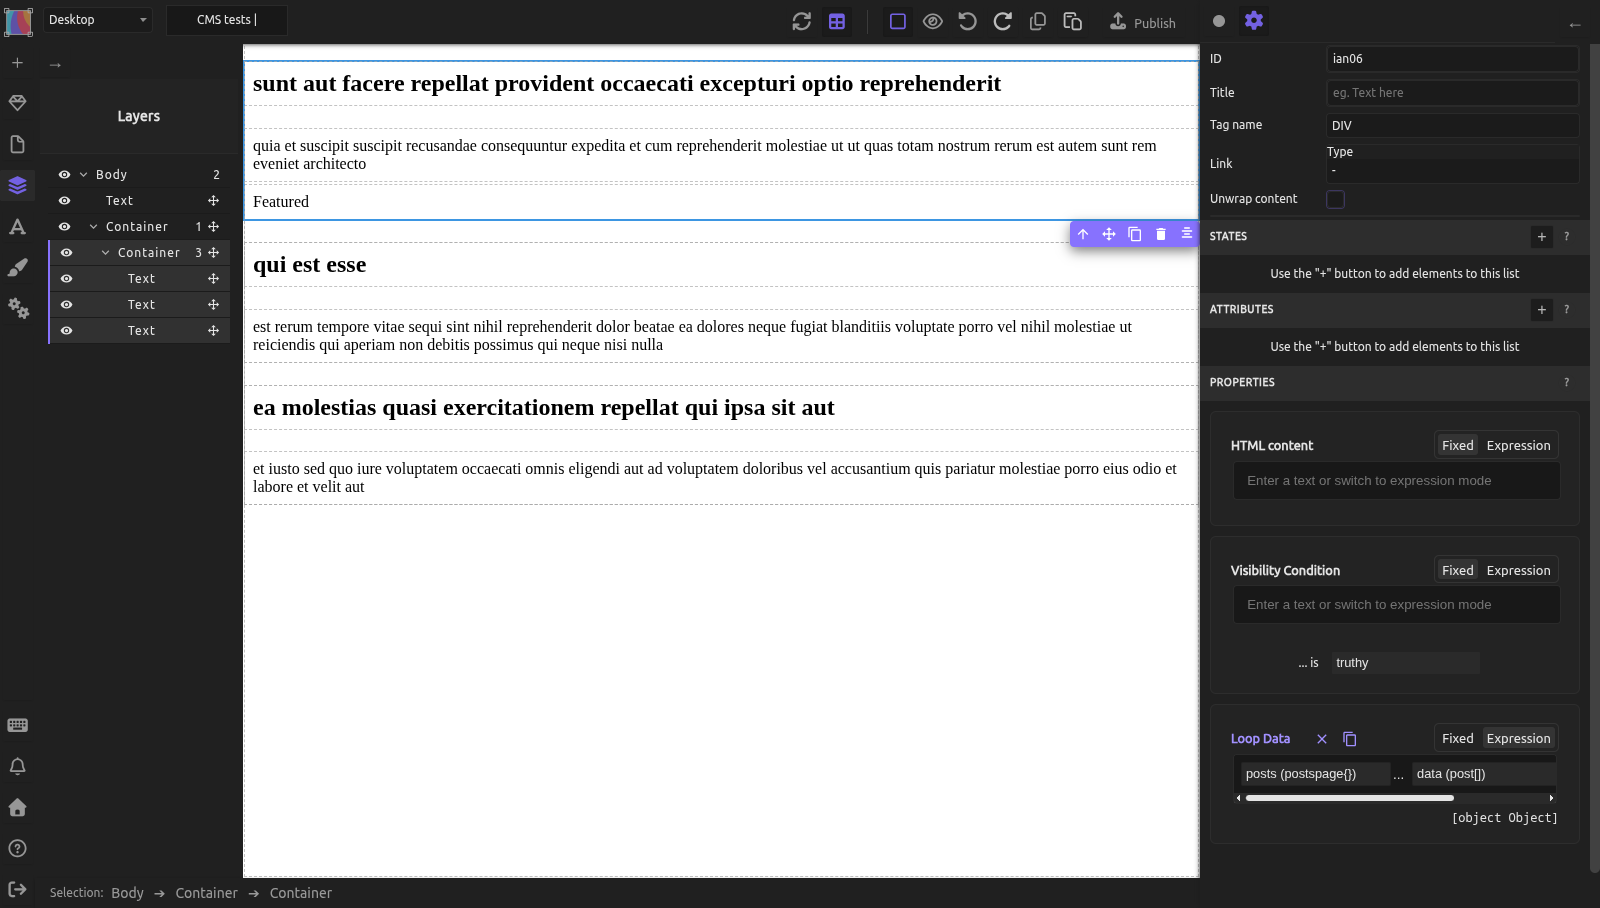
Loops let you repeat an element for each item in a list. Select the element, and in its Loop Data field, pick a list from your data source with an expression. Silex repeats the element once per item, and each copy shows the data of its own item.
This is how you display a list of blog posts, a product catalog, or team member cards: you design one element, and it repeats for every item.
How a loop works
Loop Data is a field of the Element settings (gear icon at the top of the right panel), in the Properties section. When it holds a list, for example posts:
- Silex gets the list from your data source
- It repeats the element once per item, with everything inside it
- In each copy, the Loop item is the current item: the post that this copy shows
- The elements inside the copy use the Loop item to show its title, its image, and so on
Example: your data source has 5 posts. Set Loop Data to posts, and the element appears 5 times, one for each post.
Setting up a loop
Step 1: Create the element — Add a Container to your page. This is the element that repeats. Give it a name you will recognize: open the Layers panel, double-click the element's name and type, for example, Post card.
Step 2: Design it — Add children inside (text for the title, image for featured image, link, etc.). This is what repeats.
Step 3: Set the Loop Data
1. Select the element
2. Open the Element settings (gear icon)
3. In Properties, find Loop Data and click Expression
4. Click + and pick the list from your data source (for example posts, then the field that holds the list if your API wraps it, like nodes or data)
There is no Save button: the element repeats as soon as the expression returns a list. On the canvas, you see multiple clones stacked vertically (or arranged according to your CSS).
Accessing the current item in a loop
Inside a loop, "current item" is the data for that specific clone.
To display the title of each post in the loop:
- Inside the element that repeats, add a Text
- In Properties, click Expression next to HTML content
- Click +, find the group named after your element (
Post card), pick Loop item, thentitle
Every clone shows its own title. With nested loops, each looping element has its own group, which is why naming them helps.
Practical example: blog post list
Scenario: you want to display a list of blog posts, each with a title, an excerpt and an image.
The field names below (title, excerpt, featured_image) are examples. Your CMS has its own: when you click + in an expression, the menu lists the real fields, pick the closest ones.
- From the Blocks panel, drag a Container onto the page. This is the list.
- Style it with Flexbox: Display Flex, Flex-wrap wrap, Column-gap 20px (optional, just for the layout).
- Drag a second Container inside the first one. This is one post card. Open the Layers panel, double-click the card's name and type
Post card. - Drag into the card:
- a Text for the title. Open the Element settings (gear icon) and set its Tag name to H2
- a Text for the excerpt
- an Image for the picture
- Select the card: the
Post cardContainer itself, not one of its children (click it in the Layers panel to be sure). Open the Element settings (gear icon). In Properties, find Loop Data and click Expression. Click +, pickposts, then the field that holds the list if your API wraps it (likenodesordata). - The card now appears once per post.
- Select the title. In the Element settings, under Properties, click Expression next to HTML content. Click +, find the group named
Post card, pick Loop item, thentitle. - Select the excerpt and do the same as step 7, but pick
excerptat the end. - Select the image. In the Element settings, find Attributes and click +. Type
srcand confirm. Click Expression, click +, then pickPost card, Loop item,featured_image,url. - Still on the image, add a second attribute the same way: type
alt, and pickPost card, Loop item,title. - Check the canvas: each card shows a different title, excerpt and image.
Field names depend on your CMS: in WordPress, for example, the list is posts → nodes and the image is featuredImage → node → sourceUrl.
Adding elements to a card later
Drop new blocks into the first card, or into Post card in the Layers panel. They appear in all the cards. A block dropped on another copy can land outside the card.
Nested loops
You can put a loop inside another loop. For example, show each post with the list of its comments. This builds on the Post card from the example above.
Step 1: Add the comment element
1. Drag a Container into the first Post card. It appears in all the cards. If the list is empty, for example when you design before you have posts, turn the data preview off first (table icon in the top bar, Ctrl+Alt+V).
2. Open the Layers panel, double-click the new element's name and type Comment.
Step 2: Set its Loop Data
1. Select Comment
2. Open the Element settings (gear icon)
3. In Properties, find Loop Data and click Expression
4. Click +, find the group named Post card, pick Loop item, then comments. If your API wraps the list, also pick the field that holds it, like nodes or data.
Step 3: Show the comment text
1. Drag a Text into the first Comment
2. In the Element settings, under Properties, click Expression next to HTML content
3. Click +. The menu now has two groups: Comment for the current comment, and Post card for the post it belongs to
4. Pick Comment, Loop item, then the field with the comment text (for example body)
To show something from the post inside a comment, for example its title, pick Post card, Loop item, title instead. In the + menu, each Loop item sits under the name of the element that loops. This is why you give each looping element a name in the Layers panel.
As in the example above, field names like comments and body depend on your CMS: pick the real ones from the + menu.
Limiting loop results with filters
Instead of repeating all posts, you can show only the first 3. You do this with a filter at the end of the Loop Data expression of Post card.
- Select
Post card(click it in the Layers panel to be sure) - Open the Element settings (gear icon)
- In Properties, find Loop Data. Its expression already holds your list, for example
posts, thennodes - Click the + at the end of the expression, after the list, and pick
slice - Leave Fixed on both fields. In Start index, type
0(the first post). In the second field, type3: the number of posts to show. Click Apply
The card now repeats 3 times, on the canvas and on the published site.
After a list, the + menu also offers other filters, like reverse (the list in reverse order), sort or where (keep only the items whose field has a given value). They are not described on this page yet.
Loop index and position
To number the cards (1, 2, 3…), use the position of the current item in the loop. This uses the Post card from the example above.
- Inside
Post card, add a Text - Open the Element settings (gear icon). In Properties, click Expression next to HTML content
- Click + and find the group named
Post card. Below Loop item, it has two entries for the position, named after the card, for examplePost card's Post forloop.indexandPost card's Post forloop.index0. The middle word depends on your data - Pick the one that ends with
forloop.index: it counts from 1. The one that ends withforloop.index0counts from 0
You can also use the position in a Visibility Condition.
Preview behavior in loops
The data preview shows your loop with real content on the canvas, every item of the list, so you can check how the layout looks, whether long titles wrap or overflow, and whether images show up.
Turn it off (table icon in the top bar, Disable data source preview, Ctrl+Alt+V) in two cases:
- the list is empty, and you want to design the element anyway
- the list is long, and the many copies make the page hard to design
If you changed content in your CMS and the canvas does not show it yet, click Refresh data sources, next to it (Ctrl+Alt+R). You will rarely need it. Both buttons are described in Data preview.
Learn more
- Binding data — creating states in general
- Expressions — understanding how to chain tokens
- Conditions — hiding/showing items in a loop based on data
- Filters — transforming lists (slice, where, reverse, sort, etc.)
Quiz
Q1: You want to repeat an element for each post in your blog. Which field of the Element settings do you fill?
- A) HTML content
- B) Loop Data
- C) Visibility Condition
Answer
B) Loop Data: when it holds a list, the element repeats once per item.
Q2: Inside a loop, you want to display the title of each post. What do you pick in the + menu?
- A)
posts, thentitle - B)
Post card, Loop item, thentitle - C)
titlealone
Answer
B) Post card, Loop item, title: the Loop item is the current post, the one this copy of the card shows. It sits under the name of the element that loops.
Q3: Your Post card has posts in its Loop Data, but it does not repeat on the canvas. What should you check first?
- A) That the list is not empty, and that you picked the field that holds it (like
nodesordata) - B) That the card has a name in the Layers panel
- C) That the page is published
Answer
A): the card repeats once per item of the list. If the list is empty, or if you picked posts without the field that holds the list, there is nothing to repeat. Also check that the data preview is on (Ctrl+Alt+V).
Q4: You want to show only the first 3 posts. What do you put in the Loop Data of Post card?
- A)
posts, thenfirst, thenslice - B)
posts(andnodesordataif needed), thenslicewith0and3 - C)
posts, then3
Answer
B): in slice, the first number is where to start (0 is the first post) and the second number is how many posts to show.
Q5: Inside each post card, you want to show the post's comments. How do you set up the nested loop?
- A) Set the Loop Data of
Post cardtocomments - B) Add an element inside
Post card, and set its Loop Data toPost card, Loop item,comments - C) You can't nest loops in Silex
Answer
B): the inner element repeats once per comment of the current post. You find the comments under the Loop item of Post card.