Publish: getting your site live
Your site is designed, styled, and ready. Now let's get it live on the internet for visitors to see.
Prerequisites
Before you publish, make sure:
- Your three pages are complete:
index,about,contact - Header and footer are set up as Symbols
- All links between pages use relative paths (starting with
./) - Your site looks good on mobile, tablet, and desktop (use the device preview in the toolbar)
- If you're using a contact form, you've set up the form action in the Element settings (gear icon at the top of the right panel) of the Form element
Publishing to GitLab Pages
GitLab Pages is the default publishing option in Silex. It's free, fast, and includes automatic HTTPS.
Your website is already stored in a GitLab project: you signed in with GitLab when you created it.
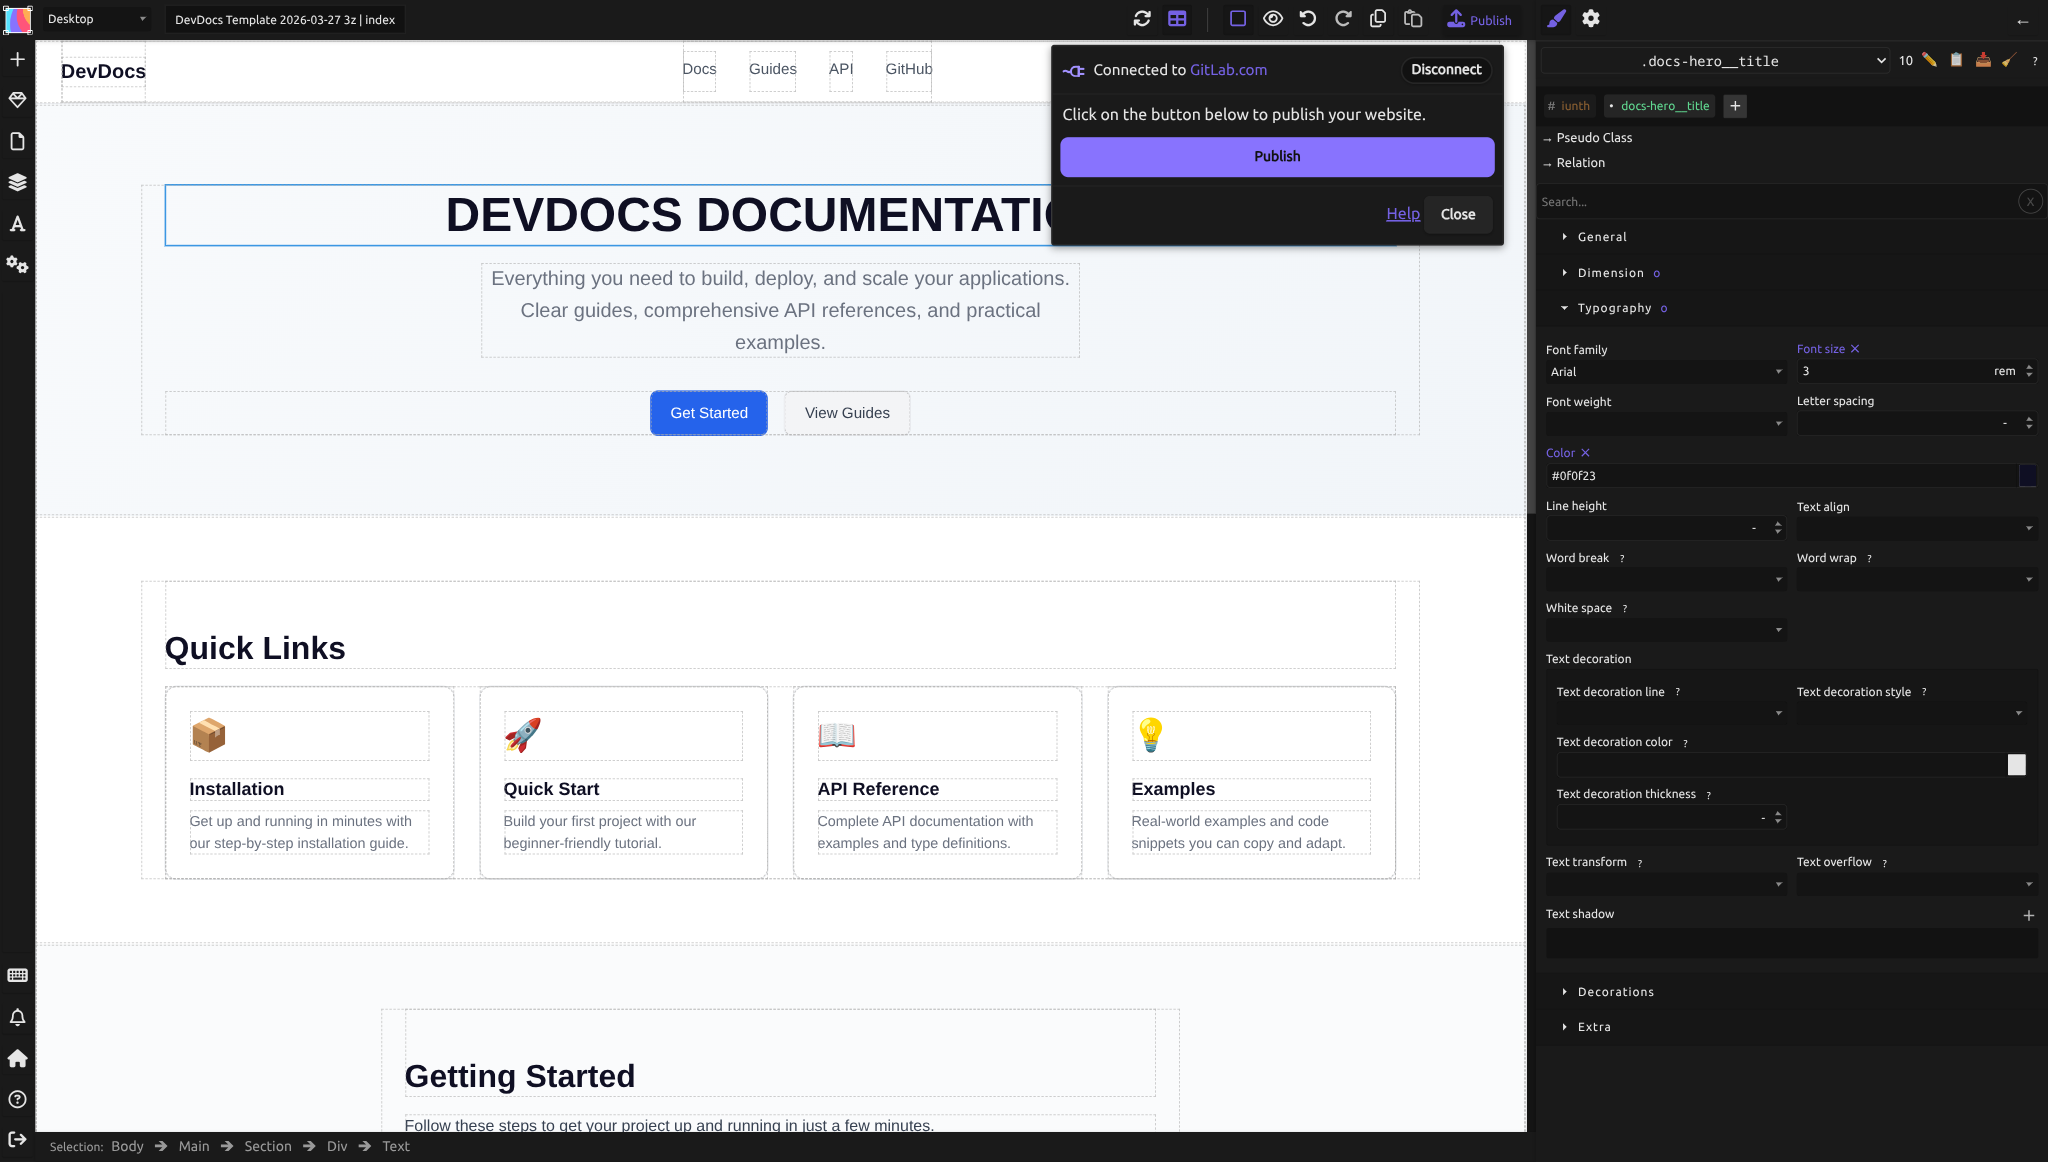
- Click the Publish button in the top toolbar (or press Alt+P)
- The Publish dialog opens and shows "Connected to GitLab.com". If it says "You need to select a hosting connector to publish your website." instead, click the GitLab button, and authorize Silex if GitLab asks you to
- Click Publish
Silex sends your files to GitLab. The dialog shows "Publication in progress..." with a progress bar.
Waiting for the build
GitLab then builds your site with build awesome (powered by Eleventy). You don't need to leave Silex: the dialog shows the build status (Queued, Building…) and a View build logs button that opens the build on GitLab. It takes 1 to 3 minutes.
When the build is done, the dialog shows "Your website is now live!" with two buttons:
- View your website opens your live site
- GitLab Pages settings opens the Pages page of your GitLab project
If the build fails, the dialog shows "Publication error" and "Build failed", with a View build logs button (see troubleshooting below).
Finding your live URL
Once the build succeeds, your site is live: the View your website button opens it. The default URL is:
For example, if your GitLab username is alice and your project is agency-portfolio:
Find this URL in GitLab:
- Go to your project page
- Click Deploy → Pages (left sidebar)
- Look for "Access pages at" — that's your site URL
- Click the link to visit your live site
Visit the homepage, click the navigation links to test that pages load, and check that your site looks good on different devices.
Troubleshooting the build
Build failed:
- In the Publish dialog, click View build logs to see the error logs on GitLab
- Look for keywords like "error" or "failed"
- Common issues:
- Incorrect internal links (must start with
./) - Missing assets or images
- Form action URLs that don't exist
Fix the issue in Silex, then click Publish again to re-upload and trigger a new build.
Site won't load at the URL:
- Check that the build succeeded ("Your website is now live!" in the Publish dialog)
- In GitLab, go to Settings → General, expand Visibility, project features, permissions, and check that Pages is set to Everyone. Your project can stay private: this setting only opens the website, not your files (see GitLab Pages access control)
- In Deploy → Pages, check that the domain is listed
- Clear your browser cache and try again
See Publish to GitLab for detailed troubleshooting.
Setting up a custom domain (optional)
If you own a domain (e.g., myagency.com), you can point it to your GitLab Pages site instead of using the default youruser.gitlab.io URL.
Steps:
- You'll need access to your domain's DNS settings (at your registrar — for example Le Bureau (cooperative), Gandi, or any registrar of your choice)
- Add a DNS A record pointing to GitLab Pages, and the TXT record GitLab gives you to verify the domain
- In your GitLab project, go to Deploy → Pages and add your domain
- Wait for DNS to propagate (5 minutes to 24 hours, typically 10-60 minutes)
- Your domain is now set up
See Custom domain for step-by-step instructions.
Making updates
Your site is live, but you're not done. When you make changes in Silex:
- Edit your site in the editor
- Click Publish again
- GitLab builds and deploys the latest version automatically
- Your site updates (usually within 2-3 minutes)
There's no limit to how many times you can publish. Publish as often as you make changes.
Next steps
Your site is now live and accessible to the world. Here are some things you might do next:
Improve SEO: Add titles, descriptions, and meta tags to each page. See SEO.
Add more content: Create more pages or add blog posts in WordPress.
Set up a custom domain: If you own a domain, point it to your GitLab Pages site. See Custom domain.
Monitor analytics: Add a tracking service (like Google Analytics) via custom code. See Custom code.
Optimize performance: Optimize images, minify CSS, or add caching headers. These are advanced topics covered in the developer documentation.
Recap
You've successfully built and published a professional agency website. Here's what you learned:
- Creating and structuring multiple pages
- Using Symbols for shared elements (header, footer)
- Building a design system with CSS variables
- Connecting WordPress as a data source
- Binding dynamic content to elements
- Publishing to GitLab Pages
- Setting up a custom domain
Congratulations! Your site is live and ready for visitors.
Related pages
- Publish to GitLab — detailed step-by-step guide
- Custom domain — pointing your own domain to GitLab Pages
- How publishing works — understanding the full pipeline
- Forms — handling form submissions
- SEO — improving search visibility
- Custom code — adding analytics and other scripts
You did it!
You just built and published a real website with open-source tools. Your code is yours, your skills are transferable, and your site is live.
Want to keep going?
- Share your site in the community chat — we'd love to see it
- Create a template from your design so others can start from it
- Vote on features you wish existed
- Report bugs you found along the way
- Subscribe to the newsletter for updates